- Lab
- A Cloud Guru
Provision Simulated Devices with Azure IoT and DPS
This hands-on lab dives even deeper into the Device Provisioning Service. We will be provisioning simulated devices using Symmetric Key and TPM attestation. We will then be able to view the registration records in the Device Provisioning Service as well as the assigned IoT Hub.
Path Info
Table of Contents
-
Challenge
Configure the Device Provisioning Service
Configure Cloud Shell
We will be using the Azure CLI in Cloud Shell to complete the steps in this objective.
Access Azure Cloud Shell using the credentials provided in the lab.
Choose the Bash environment.
Select Show advanced settings.
Use the existing storage account that resides in the resource group location and the existing
cloudshellfile share name.Install the Azure IoT extension for CLI:
az extension add --name azure-iotCreate Shared Access Policies
While many tutorials state that the DPS can use the iothubowner shared access policy to link to an IoT Hub, best practice is to configure a new shared access policy with only the permissions required to link the hub.
In Azure Cloud Shell, create the policy with the name dps and with the following permissions:
- Registry read
- Registry write
- Service connect
az iot hub policy create --hub-name <TAB> --name dps --permissions RegistryWrite ServiceConnect<TAB>is the Tab key. Press it to automatically populate the IoT Hub name.Obtain the IoT Hub Connection String
To link the IoT Hubs to the DPS with the Azure CLI, we need to obtain the connection string for both IoT Hubs. In Azure Cloud Shell, use the following command to obtain this string and copy the output to a text file:
az iot hub show-connection-string --policy-name dps --name <TAB> --output table<TAB>is the Tab key. Press it to automatically populate the IoT Hub name.Link the IoT Hubs to the DPS
Use the following Azure CLI command to link the IoT Hubs:
az iot dps linked-hub create --dps-name <TAB> --resource-group <TAB> --location <iot-hub-location> --connection-string "<hub-connection-string>"<TAB>is the Tab key. Press it to automatically populate the DPS and resource group names.<iot-hub-location>is the location of the IoT Hub (this changes per lab), and"<hub-connection-string>"is the connection string we obtained earlier in the objective. Don't forget the quotes!Obtain the DPS ID Scope
Finally, we will run the following command to obtain the ID Scope of the DPS. We will use this in a future objective, so make note of it.
az iot dps show --name <TAB> --resource-group <TAB><TAB>is the Tab key. Press it to automatically populate the DPS and resource group names. Copy the value of the idScope property to a text file.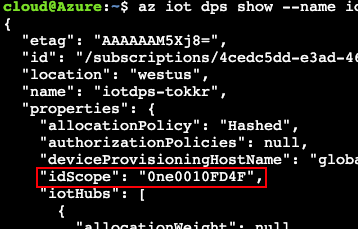
-
Challenge
Prepare Development Workstation
Next, we will set up our development workstation. We will be using Visual Studio Code for this lab.
Connect to Virtual Machine
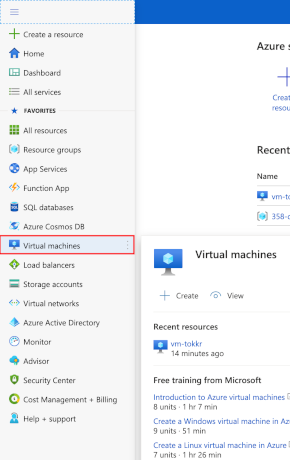
Using the Azure Portal, locate the virtual machine for the lab by clicking on Virtual Machines in the Hub Navigation menu.
Click on the virtual machine for the lab (named
vm-XXXXX) and click Connect, then on RDP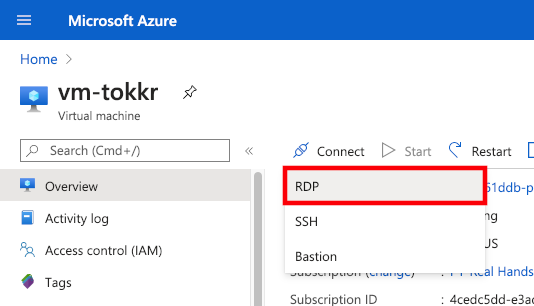
Open the file using the RDP application of your choice. A few RDP applications for MacOS and Linux can be found on the instructions portion of this page.
The credentials for the virtual machine are available in the "Credentials" section.
Download Sample Code
On the virtual machine, open Visual Studio Code (it has been pre-installed). Click on the Source Control icon on the left hand side of the application (Ctrl + Shift + G).
Click on Clone Repository. The URL for the course repository can be found at: https://github.com/linuxacademy/content-AZ-220.git. Choose the default location to source the clone. If asked to open the repository, click Open.
-
Challenge
Create Enrollment Group Using Symmetric Key Attestation
Using the Azure Portal, click on the resource group for the lab.
Click on the Device Provisioning Service, named
iotdps-XXXXX, whereXXXXXis the five-character suffix for the lab resources.Click on Manage Enrollments in the DPS Blade menu, then click on + Add Enrollment Group. Configure your enrollment group with the following settings (all other settings can remain at the defaults):
- Group Name: SymKeyEG1
- Attestation Type: Symmetric Key
- Initial Device Twin State: { "tags": {}, "properties": { "desired": { "dps_enrollment": "symmetrickeys" } } }
Click Save when finished to create the enrollment group.
Obtain the primary and secondary enrollment keys for the enrollment group by clicking on SymKeyEG1 and clicking the copy icon next to each value. Paste these into a text file. We will use them in a future objective.
-
Challenge
Provision Simulated Devices Using Symmetric Key Attestation
We will be using a C# application that will simulate a device. This application uses Symmetric Key attestation to enroll devices to the DPS.
Modify Symmetric Key Sample
On the development workstation, navigate to the
samples\provisioning\Samples\device\SymmetricKeySampledirectory and openProgram.cs. Install the C# extension if prompted.Modify lines 42 and 43, replacing the
enrollmentGroupPrimaryKeyandenrollmentGroupSecondaryKeyconstants with the primary and secondary enrollment keys obtained in objective 2. Save the file.
Run the Sample
Right-click the
samples\provisioning\Samples\device\SymmetricKeySampledirectory and click on Open in Terminal.In the terminal execute the application using the following syntax:
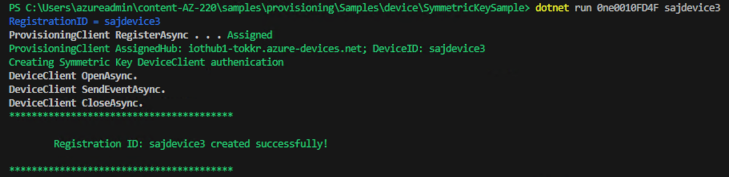
dotnet run <ID_Scope> <Device_ID><ID_Scope>is the ID Scope of the Device Provisioning Service that you obtained in Objective 1.<Device_ID>can be any alpha-numeric value that you wish to use. This will act as the "name" of the device that we're registering with the DPS.Verify Device Provisioning
If your device provisions successfully, you'll receive a notification in the terminal similar to the following:
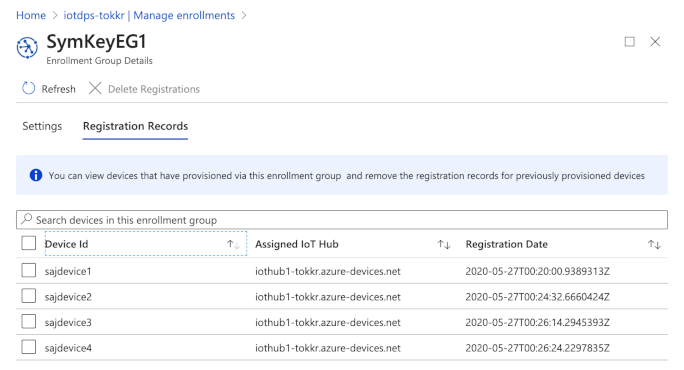
You can further verify successful provisioning by looking in the Registration Records section of the SymKeyEG1 enrollment group in the DPS:
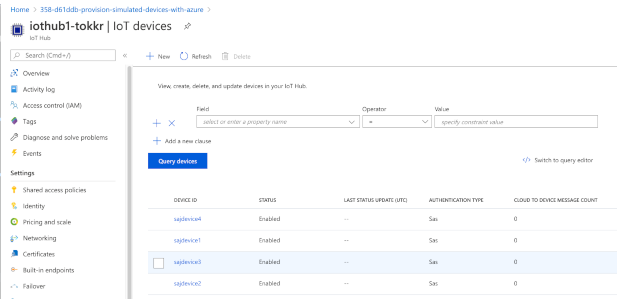
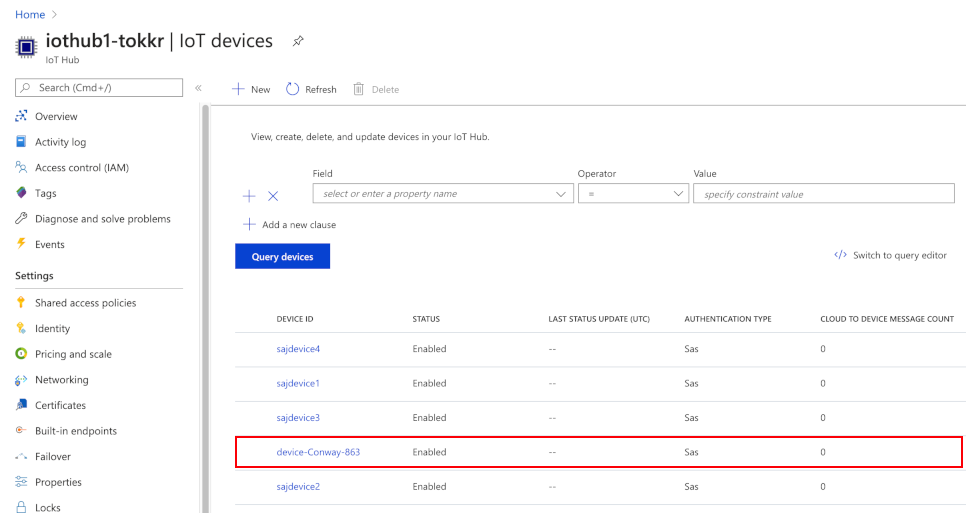
Finally, you can verify the existence of the device in the IoT Hub device registry:
-
Challenge
Provision Simulated Devices Using Trusted Platform Module (TPM) Attestation
We will be using a C# application that will simulate a device. This application uses Trusted Platform Module, or TPM, attestation to enroll devices to the DPS.
Run TPM Sample
This sample will create a random device name, so there is nothing for us to create. We simply need to run the sample and create the enrollment entry during the process.
On the development workstation, right-click the
samples\provisioning\Samples\device\TPMSampledirectory and click on Open in Terminal.In the terminal execute the application using the following syntax:
dotnet run <ID_Scope><ID_Scope>is the ID Scope of the Device Provisioning Service that you obtained in Objective 1.When the application starts, it will automatically start the TPM simulator. This simulator will return an endorsement key, registration ID, and device ID that we will use in our individual enrollment entry:

Leave this information on the screen.
Create the Enrollment Entry
Switch to the Azure Portal, and click on the resource group for the lab.
Click on the Device Provisioning Service, named
IoTDPS-XXXXX, whereXXXXXis the five-character suffix for the lab resources.Click on Manage Enrollments in the DPS Blade menu, then click on + Add Individual Enrollment. Configure your enrollment entry with the following settings (all other settings can remain as default):
- Mechanism: TPM
- Endorsement Key: Copy this from the development workstation.
- Registration ID: Copy this from the development workstation.
- Initial Device Twin State: { "tags": {}, "properties": { "desired": { "dps_enrollment": "TPM" } } }
Click Save when finished to create the enrollment entry.
Complete TPM Enrollment
Switch back to the development workstation. Press Enter to complete the device enrollment.
Verify Device Provisioning
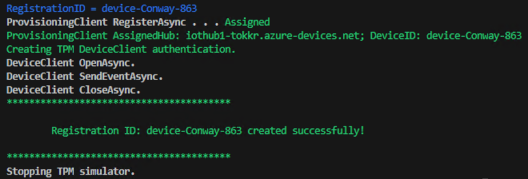
If your device provisions successfully, you'll receive a notification in the terminal similar to the following:
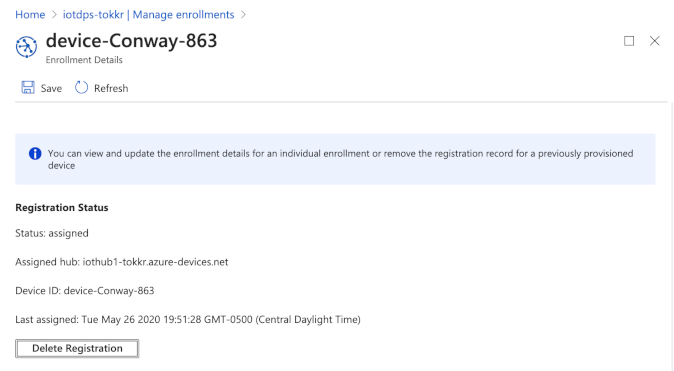
You can further verify successful provisioning by clicking on the Individual Enrollments record for the device in the DPS:
Finally, you can verify the existence of the device in the IoT Hub device registry:

What's a lab?
Hands-on Labs are real environments created by industry experts to help you learn. These environments help you gain knowledge and experience, practice without compromising your system, test without risk, destroy without fear, and let you learn from your mistakes. Hands-on Labs: practice your skills before delivering in the real world.
Provided environment for hands-on practice
We will provide the credentials and environment necessary for you to practice right within your browser.
Guided walkthrough
Follow along with the author’s guided walkthrough and build something new in your provided environment!
Did you know?
On average, you retain 75% more of your learning if you get time for practice.

