- Lab
- A Cloud Guru
Registering a Device with Azure IoT Hub
An Azure IoT Hub by itself isn't much of an IoT solution. As a matter of fact, it isn't one at all. Without devices to send telemetry to the IoT hub, the hub itself is like an ice cream shop with zero flavors. In this hands-on lab, we will create a device in a pre-provisioned Azure IoT hub and then, using a Raspberry Pi simulator, connect that device to our IoT hub. We will then be able to see connectivity between the device and our hub.
Path Info
Table of Contents
-
Challenge
Register the Device with the IoT Hub
-
Access the CLI by using Azure Cloud Shell, logging in with the credentials provided in the lab.
-
Click the Cloud Shell icon (
>_) in the upper-right of the screen. -
Click Bash.
-
Click Show advanced settings, and set the following values:
- Subscription: Leave default
- Resource group: Use Existing
- Cloud Shell region: Use the same region as your lab provided storage account.
- Storage account: Use existing
- File share: Create new, and enter cloudshell
-
Click Create storage.
-
Install the Azure IoT extension for CLI:
az extension add --name azure-iot -
Register the device (
XXXXXis the five-character suffix for the lab resources):az iot hub device-identity create --device-id IoTDevice1 --hub-name iothub-XXXXX -
Obtain the connection string for the device (
XXXXXis the five-character suffix for the lab resources):az iot hub device-identity connection-string show --hub-name iothub-XXXXX --device-id IoTDevice1 --output table -
Copy this connection string to your clipboard.
-
-
Challenge
Configure the Raspberry Pi Azure IoT Online Simulator
-
Access the simulator at https://azure-samples.github.io/raspberry-pi-web-simulator/.
-
Change the following line (line 15), replacing the text between the single quotes with the connection string you copied in the previous objective:
const connectionString = '[Your IoT hub device connection string]';
-
-
Challenge
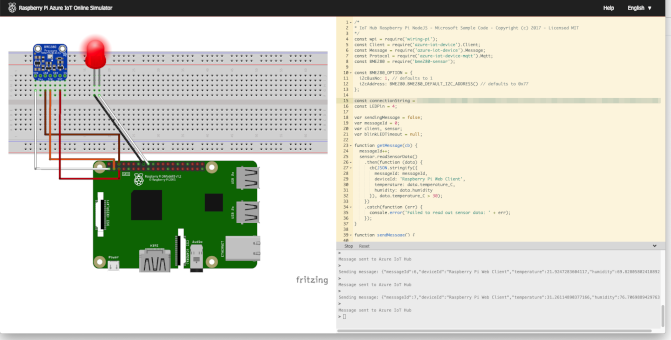
Verify Connectivity to the IoT Hub
In the Raspberry Pi Azure IoT Online Simulator, click Run. If the previous objective was performed correctly, the "LED" light will blink, and you should see messages from the "device" being sent to the IoT hub, like so:

What's a lab?
Hands-on Labs are real environments created by industry experts to help you learn. These environments help you gain knowledge and experience, practice without compromising your system, test without risk, destroy without fear, and let you learn from your mistakes. Hands-on Labs: practice your skills before delivering in the real world.
Provided environment for hands-on practice
We will provide the credentials and environment necessary for you to practice right within your browser.
Guided walkthrough
Follow along with the author’s guided walkthrough and build something new in your provided environment!
Did you know?
On average, you retain 75% more of your learning if you get time for practice.

