- Lab
- A Cloud Guru
Configuring Alerts for Azure SQL
Azure gives us the ability to alert on several metrics available in our Azure SQL environment. With a few clicks, it can notify you about critical changes or performance issues with your SQL databases, server, data warehouses and more. In this hands-on lab, we will create an alert for our SQL database alerting us via email of an export of our pre-deployed database.
Path Info
Table of Contents
-
Challenge
Log In to the Azure Portal and Create a Storage Account
-
Log in to the Azure portal with the credentials provided.
-
Click on All resources in the navigation hub menu and familiarize yourself with the Azure resources that have been provisioned, including:
- One Azure SQL database
- One Azure SQL server
-
Note the naming convention of the SQL resources, particularly the 5-character lab code suffix. You'll need the suffix for the storage account creation.
-
Click on + Add and search the Azure marketplace for a storage account.
-
Create the storage account with the following parameters:
- Subscription: Leave as default.
- Resource group: The resource group of the lab. It will be the only one available.
- Storage account name: saXXXXX, where XXXXX is the 5-character lab suffix you previously noted.
- Location: (US) West US
- Performance: Standard
- Account kind: StorageV2 (general purpose v2)
- Replication: Locally-redundant storage (LRS)
-
Click Review + Create and then Create to create the storage account.
-
-
Challenge
Configure the Azure SQL Database for Alerting
In the Azure portal, under All resources, click the entry for the SQL server named sqls-XXXXX, where XXXXX is a five-character unique lab ID for this lab.
Configure Firewall
- In the sqls-XXXXX blade, click Firewalls and virtual networks.
- Enable the setting for "Allow access to Azure services and resources to access this server" to On.
- Click Save.
-
Challenge
Create an Alert Rule and Action Group for the SQL Database
In the Azure portal, under All resources, click the entry for the SQL database named sqldb-XXXXX, where XXXXX is a five-character unique lab ID for this lab.
Configure Alert Rule
- Click Alerts in the database blade menu.
- Click on + New alert rule at the top of the pane.
- In the Create rule dialog, leave the Resource as sqls-XXXXX/sqldb-XXXXX, where XXXXX is a five-character unique lab ID for this lab.
- Under Condition, click Add.
- In the Monitor service dropdown box, select Activity Log - Administrative, then click Export an existing database. (Microsoft.Sql/servers/databases).
- Click Done to finalize your selection.
Configure Action Group
-
Under Actions, click Create action group.
-
In the Add action group dialog, create an action group with the following parameters:
- Action group name: AGroup1
- Short name: AGroup1
- Subscription: Leave as default.
- Resource group: Change to the resource group for the lab. NOTE: Failing to change this group will cause a failure in the alert group creation.
- Actions:
- Action name: Emailme
- Action type: Email/SMS/Push/Voice
-
In the Email/SMS/Push/Voice dialog that appears, check the box next to Email and enter your email address into the Email text box.
-
Click OK to exit the dialog and OK once more to create the action group. You will be returned to the Create rule dialog.
NOTE: Once the action group has been created, you will receive an email stating you have been added as a member of the action group.
Finalize Alert Rule
- Back in the Create rule pane, enter an Alert rule name (e.g., "SQL Database Exported"), and then press Tab.
- A green checkbox will appear next to the alert rule name, and a Create alert rule button will appear at the bottom of the page. Click this button to create the alert rule. NOTE: Wait approximately five (5) minutes for the alert rule to become enabled before proceeding to the next objective.
-
Challenge
Export the SQL Database to Trigger the Alert
-
While remaining in the SQL database blade, click on Overview at the top of the blade menu.
-
Click Export to trigger an export of the SQL database.
-
In the Export database dialog, configure the export with the following parameters:
- File name: Leave as default
- Subscription: Leave as default
- Storage: Click and select the following options:
- Storage account: The storage account created in the first objective
- Container: Click + Container and create a new blob container named "sqlexport". Leave the Public access level set to Private (no anonymous access). Click OK to create the container. Back in the Containers dialog, click the container to select it and click Select.
- Authentication type: Cannot be changed
- Server admin login: azureadmin
- Password: LA!2019!Lab1
-
Click OK to export the database.
-
-
Challenge
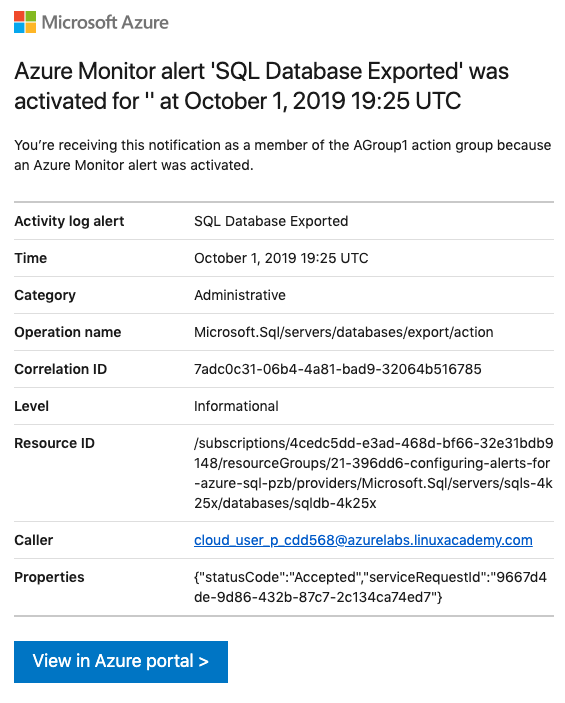
Monitor Email for the Incoming Alert
Open your email client and wait for an email message from Microsoft Azure with the alert details. You may receive more than one email message, as multiple entries with Export an existing database (Microsoft.Sql/servers/databases) will be written to the activity log.

What's a lab?
Hands-on Labs are real environments created by industry experts to help you learn. These environments help you gain knowledge and experience, practice without compromising your system, test without risk, destroy without fear, and let you learn from your mistakes. Hands-on Labs: practice your skills before delivering in the real world.
Provided environment for hands-on practice
We will provide the credentials and environment necessary for you to practice right within your browser.
Guided walkthrough
Follow along with the author’s guided walkthrough and build something new in your provided environment!
Did you know?
On average, you retain 75% more of your learning if you get time for practice.

