Gluster File System Tips: How to set up a GlusterFS cluster
In this article, we explain what GlusterFS is, how to set up a simple three-note GlusterFS cluster, and share some links to further learning resources.
Jun 08, 2023 • 5 Minute Read

Looking for a distributed storage solution that can scale into the petabytes range? Then it’s worth your time to learn about GlusterFS. In this article, I explain what GlusterFS is, how to set up a simple three-note GlusterFS cluster, and share some links to further learning resources.

Your keys to a better career
Get started with ACG today to transform your career with courses and real hands-on labs in AWS, Microsoft Azure, Google Cloud, and beyond.
What is GlusterFS?
GlusterFS is a software-defined storage platform, well suited for both the enterprise environment and personal use. It is open source and free, with paid support options available. GlusterFS can be deployed on bare metal, containers, virtual machines, and even in cloud environments.
Some of the benefits of using GlusterFS include:
- Scalability
- POSIX compliance
- Multiple filesystem support
- Optimization options for different workloads
- Geo-replication
- Ability to handle many clients
How to set up a GlusterFS Cluster
For the purposes of this article, I will be using Ubuntu 20.04 as the operating system. However, you can use a different Linux distribution if you choose. The main difference will only be in how you install the software packages (e.g. yum, dnf, or apt).
I will be using three servers with the following IP addresses and hostnames.
10.0.2.101 server-1
10.0.2.102 server-2
10.0.2.103 server-3
Getting Started
The first thing that we need to do is make sure that the systems can communicate with each other. This can be done by adding their name and IPs to /etc/hosts (on each server). Another (and preferred way) would be to add these systems into your DNS resolvers.
A note about firewalls: GlusterFS requires certain ports to be opened on any firewalls to allow proper communication. For this guide, I will not be enabling any firewalls. The chart below maps out the ports you will need to open if you intend to use a firewall.
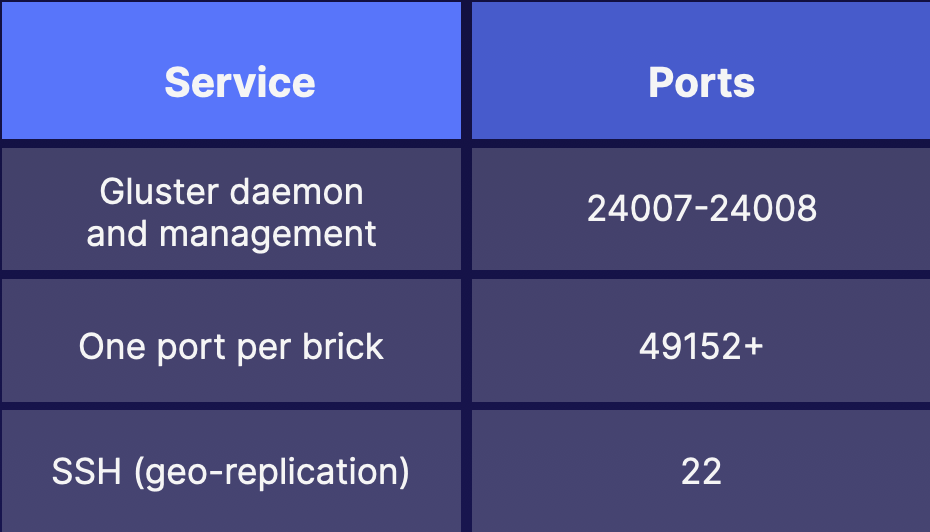
*port brick range can be set in /etc/glusterfs/glusterd.vol
Installing GlusterFS
The following steps should be completed on each server, and also using sudo or the root user. Firstly, update the package list for apt.
apt-get updateOnce the update has completed, you can then move onto installing the GlusterFS server and client packages, along with starting and enabling the glusterd service.
apt install -y glusterfs-server glusterfs-client
systemctl enable --now glusterd
Setting up your storage (aka Bricks)
Now that you have glusterFS installed and the service running, it is time to prepare your storage bricks. Create a partition on the storage device you want to use (run on every server).
parted --script -a optimal -- /dev/nvme1n1 mklabel gpt mkpart primary 1MiB -1Next put a filesystem on the new partition, create a mount point, and mount the filesystem on each server
mkfs.xfs -i size=512 /dev/nvme1n1p1
mkdir /gfs
mount /dev/nvme1n1p1 /gfs
Lastly, we need to create a sub-directory in /gfs. This will become our brick.
mkdir /gfs/brick-1**If you don’t have a storage device to create a partition on, you can just create the directory /gfs/brick-1 and use it. This is not a best practice, but for demonstration purposes it will work fine.
Setting up a Trusted Storage Pool
At this point, you have three servers running GlusterFS, and an available storage device (or directory) that will be used in your first glusterfs volume. Before you set up the volume though, a trusted storage pool needs to be created. This is essentially telling GlusterFS what hosts to use for storage.
From your first server run the following commands. Substitute your server names in if they are different then the ones used in this example.
gluster peer probe server-2
gluster peer probe server-3
You should now be able to check the status of your trusted storage pool and see the connected servers.
gluster pool listCreating your first GlusterFS volume
Now you are ready to create your first glusterFS volume. There are a few different types of volumes, but for this demonstration you will be creating a distributed volume. This type of volume distributes your files across all the bricks that you created your volume with.
Run the following command on your first server to create a new distributed volume with the name gfs_vol
gluster volume create gfs_vol server-1:/gfs/brick-1 server-2:/gfs/brick-1 server-3:/gfs/brick-1Before you can start using your volume it will need to be started.
gluster volume start gfs_volYou are now ready to mount the volume and start using it. You can mount it wherever you want, this example is mounting the volume to /mnt
mount -t glusterfs server-1:/gfs_vol /mnt
df -h /mnt
Wrapping it up
That is all there is to creating a basic distributed glusterFS volume! You can now create files on the volume. As files are created, they are distributed between the bricks on the server.
By examining the directory or storage device on each server you will see different files due to the distribution. Viewing the actual volume through the mount point will provide access to all the files distributed across your cluster.
To learn more about GlusterFS, volumes, and management, I invite you to join me over at A Cloud Guru in my course GlusterFS Deep Dive. I hope to see you there, and until next time, keep being awesome Gurus!
